Humerus
EditThis page is being worked on.
Content may be incomplete, improperly formatted, or inaccurate.
Goal: Understand how the humerus relates to the body as a whole.
Purpose: To encourage deeper, longer-lasting learning by linking the bone to the skeletal, muscular, and cardiovascular systems rather than relying on rote memorization.
How to use this guide: Follow the five structured steps below.
Each step relates the bone to the bigger picture to help you understand the material and remember it for longer.
Location
Question: Where is the bone?
Purpose: Helps you build a mental map of the skeleton.
Shape
Question: What is the bone's shape?
Purpose: Gives insight into how the bone interacts with the body.
Neighbors
Question: What bones articulate (form joints with) this bone? What is the type of each joint?
Purpose: Lets you examine what joints the bone is part of and what movements those joints allow.
Anatomical Landmarks
Question: What are the named parts of the bone? What is the significance of each?
Purpose: Connects each named location to the muscles, nerves, blood vessels, and other bones that interact with the location.
Blood Supply
Question: What blood vessels nourish the bone?
Purpose: Relates the bone to the cardiovascular system and builds your mental map of the body's blood vessels.
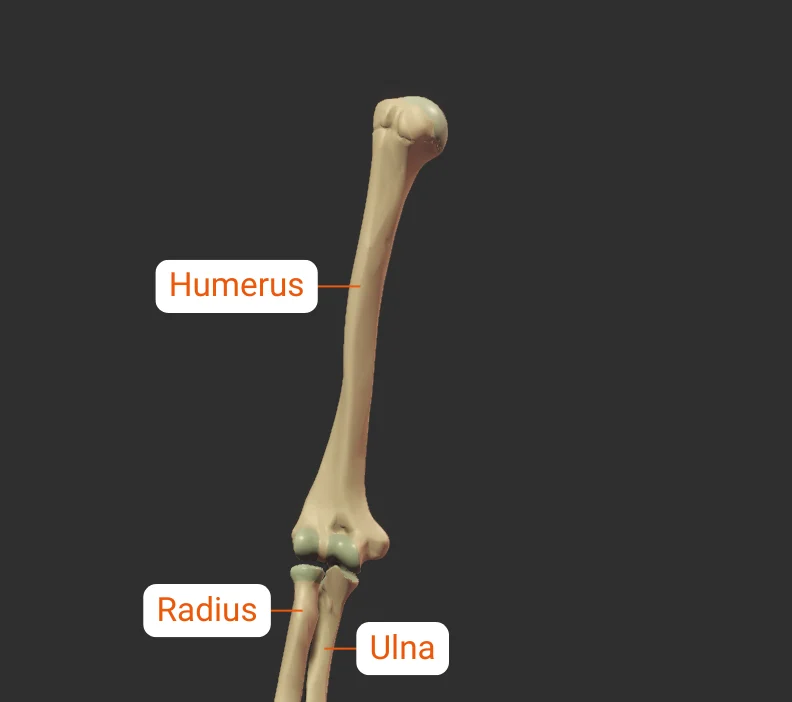
The humerus is found in the upper arm between the shoulder and elbow.
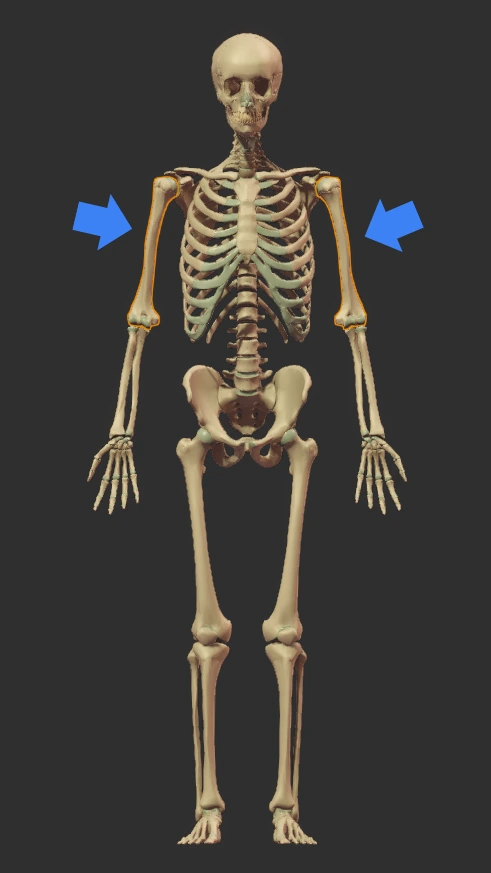
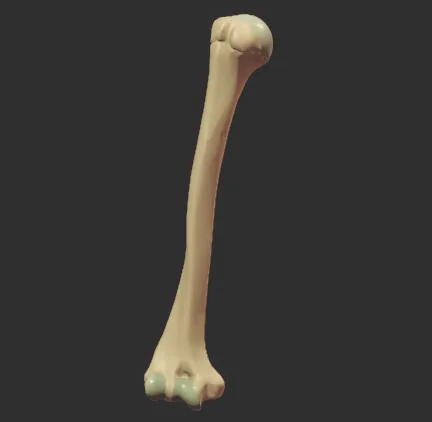
The humerus is a long bone, which means it functions as a lever to enable movement of the arm.
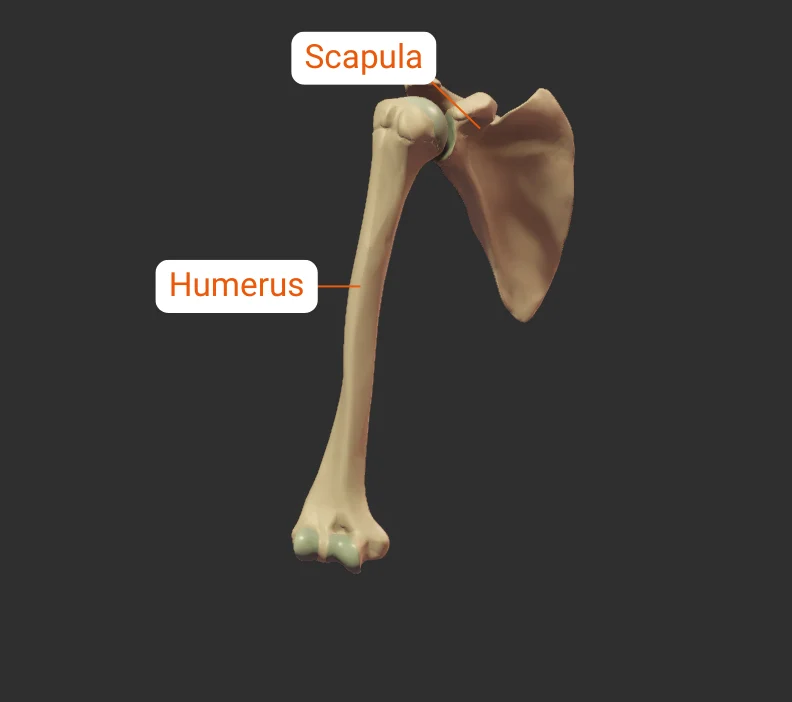
The humerus has neighboring bones at its two ends: the proximal end at the shoulder, and the distal end at the elbow.
Proximal
Click image to hide labels.
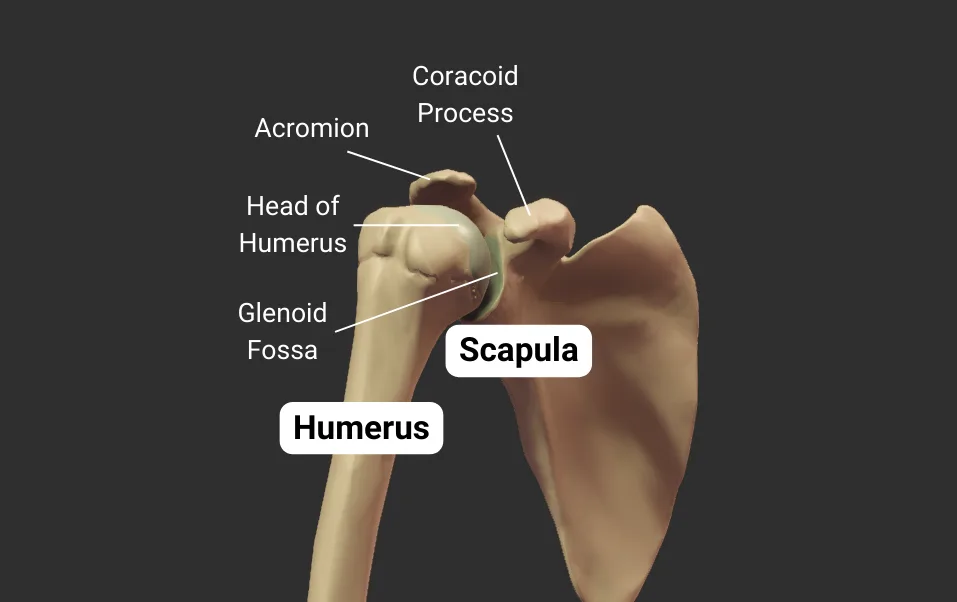
The proximal end of the humerus articulates with the following bones:
Click the bulleted names for more information.
Click image to show/hide labels. Right click to enlarge.
- Humeral head: spherical, like a ball
- Glenoid fossa: a socket, concave like a cup
- Joint type: synovial ball-and-socket
- Allowed motion: circumduction and rotation
Click image to show/hide labels. Right click to enlarge.
Click image to hide labels.
Distal
Click image to hide labels.
The distal end of the humerus articulates with the following bones:
Click the bulleted names for more information.
Click image to show/hide labels. Right click to enlarge.
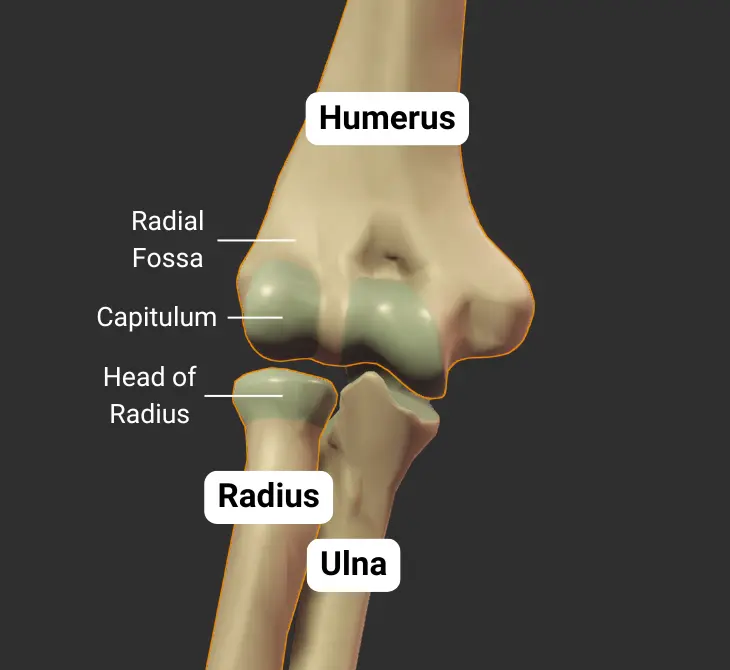
- Humeral capitulum: rounded
- Radial head: concave
- Joint type: synovial pivot
- Allowed motion: pronation, supination, flexion, and extension of the forearm
Click image to show/hide labels. Right click to enlarge.
Click image to hide labels.
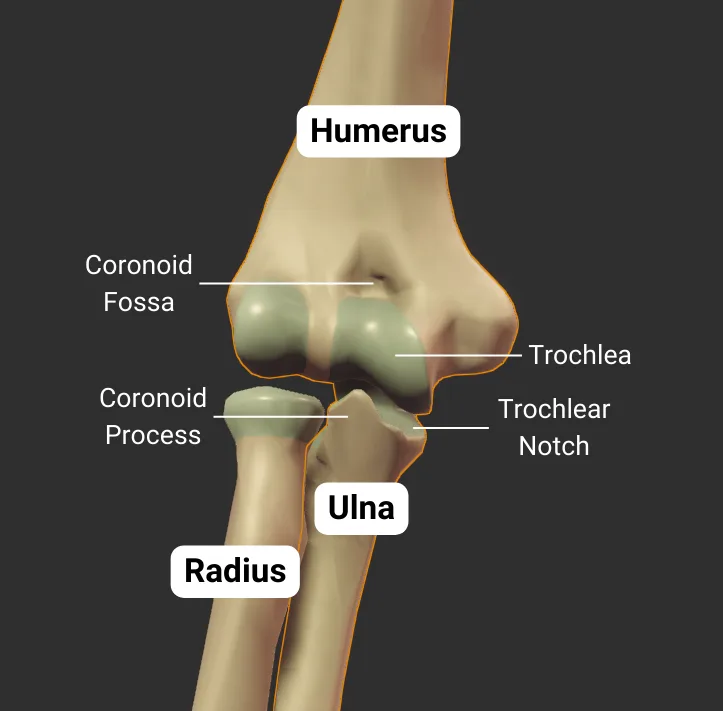
- Humeral trochlea: cylindrical structure narrower in the middle than on the outside (like an hourglass)
- Ulnar trochlear notch: C-shaped, wraps around humeral trochlea
- Joint type: synovial hinge
- Allowed motion: flexion and extension of the forearm
Click image to show/hide labels. Right click to enlarge.
Click image to hide labels.
Most of the named landmarks on the humerus are sites of muscle attachment. Some are grooves that guide tendons, nerves, and blood vessels. Others are indentations (fossas) that accommodate parts of neighboring bones during movement.
Head and Neck
Click image to hide labels.
The head and neck of the humerus encompasss the following landmarks:
Click the bulleted names for more information.
Click image to show/hide labels. Right click to enlarge.
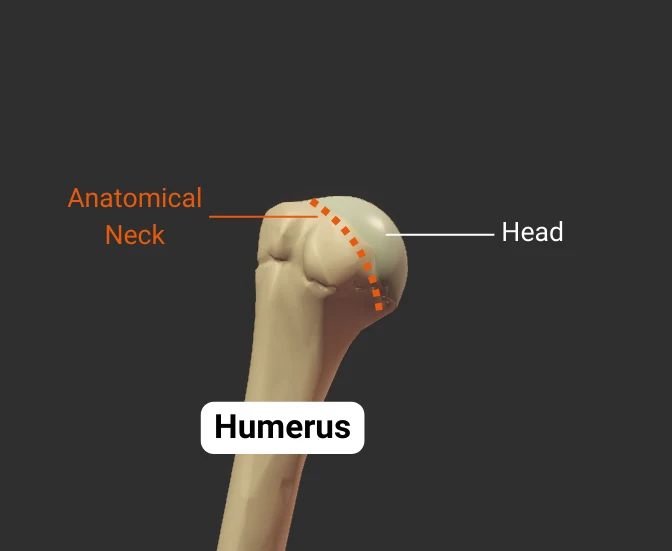
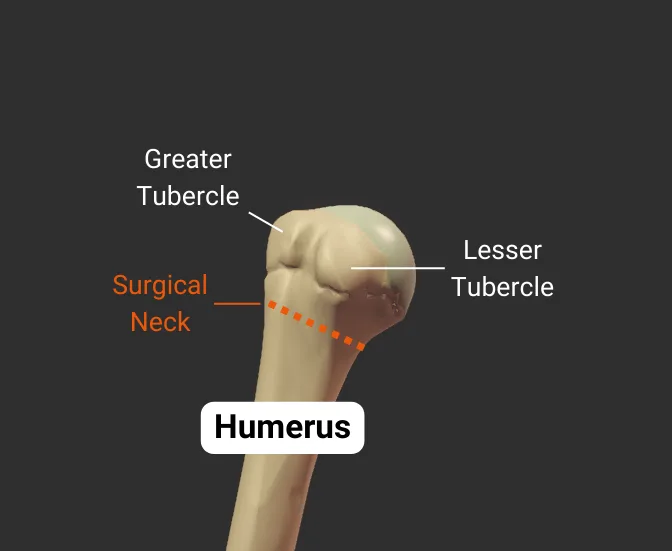
- Narrow region distal to the humerus's head
- Attachment site for the glenohumeral joint's capsule
Click image to hide labels.
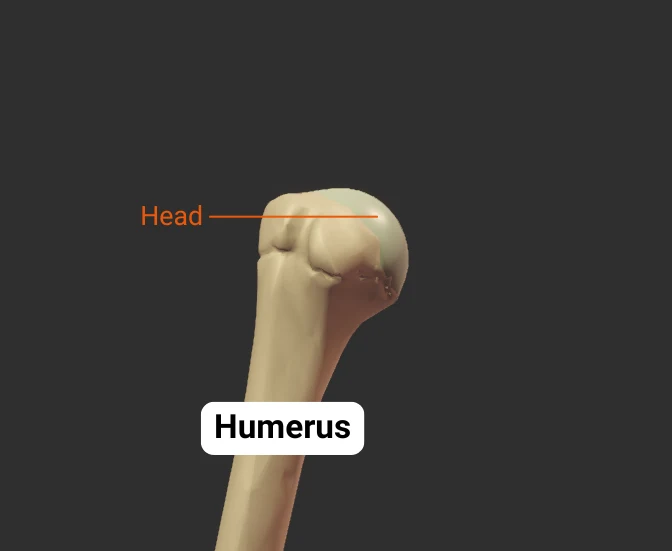
- Articulates with glenoid fossa of scapula to form the shoulder (glenohumeral) joint
Click image to hide labels.
- Narrow region distal to tubercles
- Common fracture site
- Close to axillary nerve, anterior circumflex humeral artery, and posterior circumflex humeral artery
Click image to hide labels.
Tubercles
Click image to hide labels.
The tubercles of the humerus encompass the following landmarks:
Click the bulleted names for more information.
Click image to show/hide labels. Right click to enlarge.
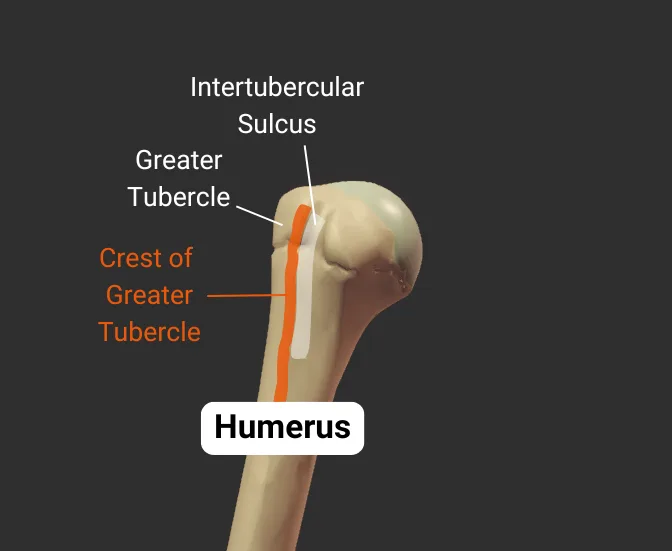
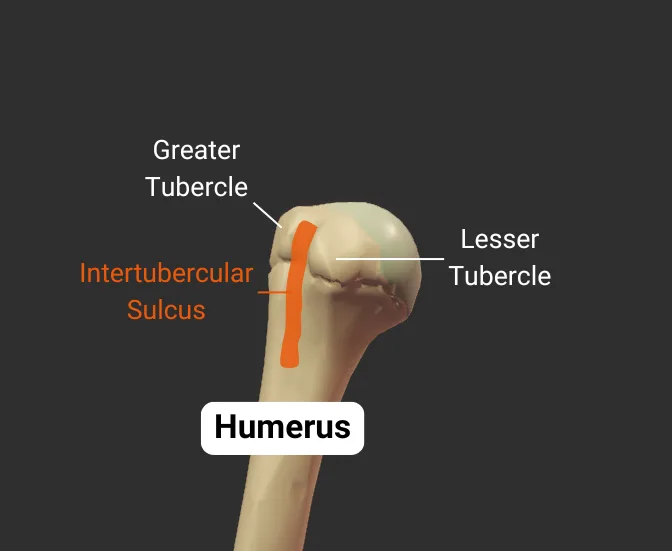
- Lateral lip of the intertubercular sulcus
- Insertion site for the pectoralis major's tendon
Click image to hide labels.
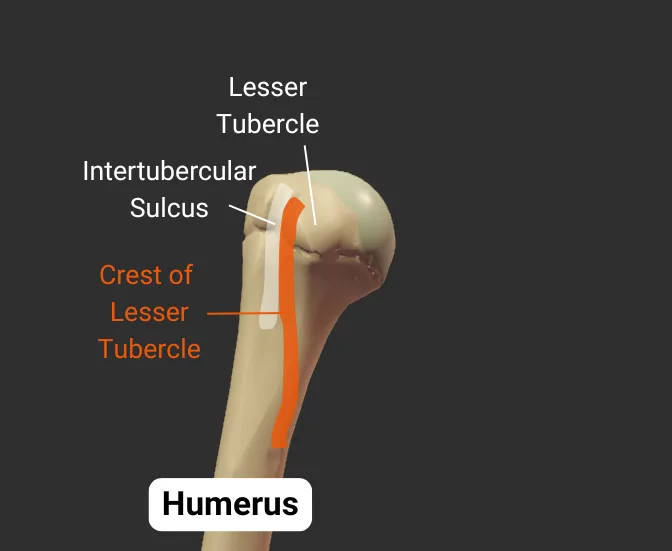
- Medial lip of the intertubercular sulcus
- Insertion site for the teres major's tendon
Click image to hide labels.
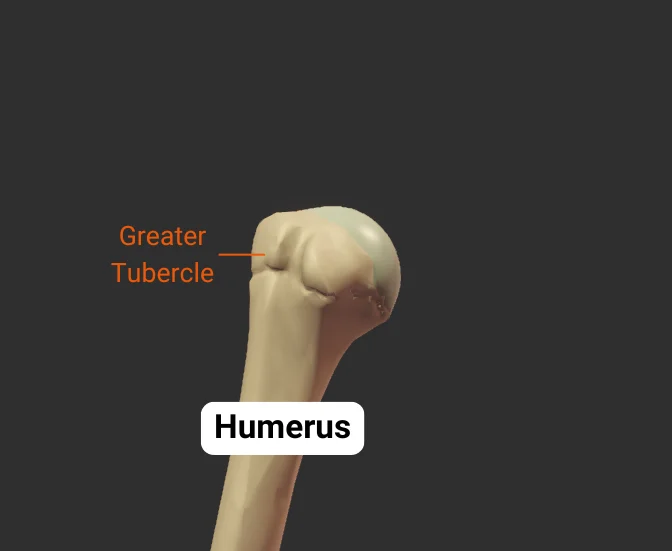
- Lateral projection between the anatomical and surgical necks
- Insertion site for supraspinatus, infraspinatus, teres minor (rotator cuff muscles)
- Covered by the deltoid to form a person's rounded shoulder
Click image to hide labels.
- Groove between the greater and lesser tubercles
- Guides the long tendon of the biceps brachii
- Also called the bicipital groove due to its relation with the biceps brachii tendon
- Insertion site for the latissimus dorsi
Click image to hide labels.
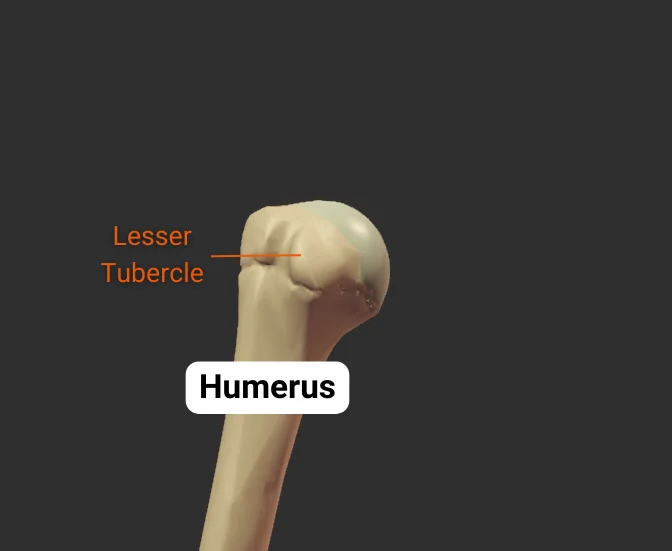
- Anterior projection between the anatomical and surgical necks
- Insertion site for the subscapularis (rotator cuff muscle)
Click image to hide labels.
Body
Click image to hide labels.
The body of the humerus encompasss the following landmarks:
Click the bulleted names for more information.
Click image to show/hide labels. Right click to enlarge.
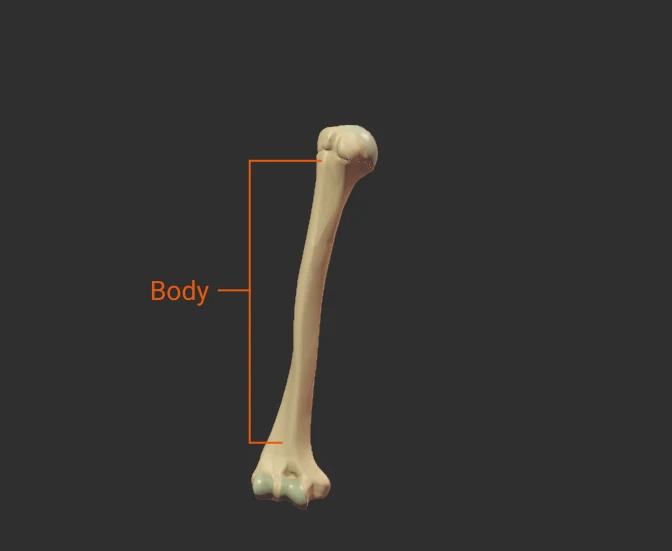
- The shaft of the humerus (the bone's long midsection)
Click image to hide labels.
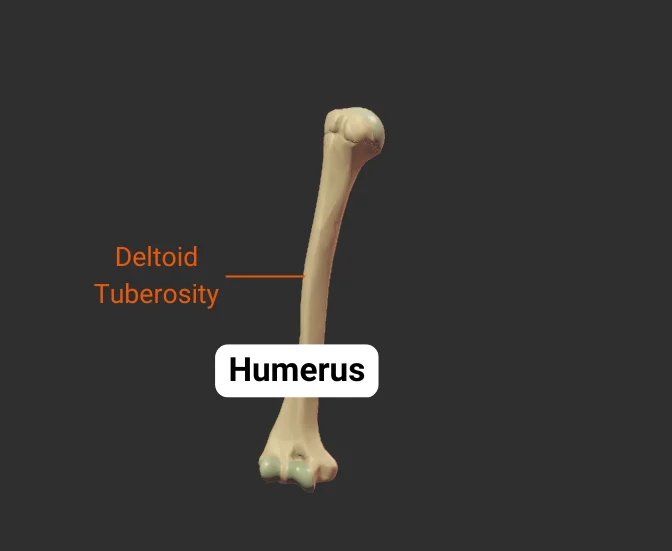
- Rough lateral region in the middle of humerus
- Insertion site for the deltoid
Click image to hide labels.
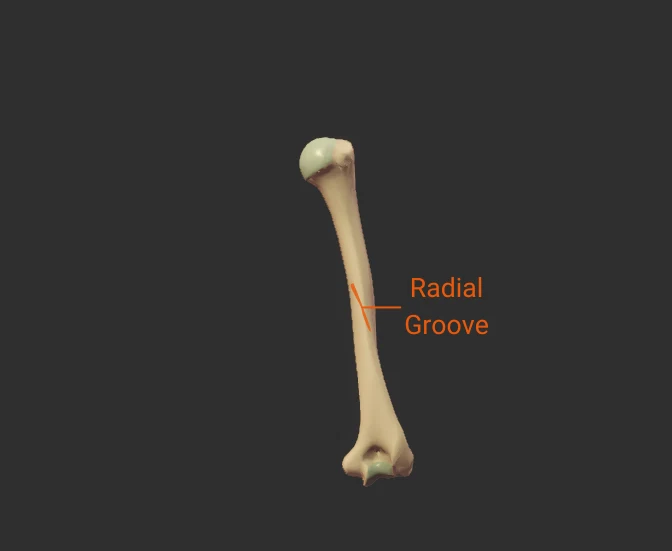
- Spiral groove on the shaft's posterior surface
- Guides the radial nerve and deep brachial artery
- Fractures here risk nerve injury
Click image to hide labels.
Borders
Click image to hide labels.
The borders of the humerus encompass the following landmarks:
Click the bulleted names for more information.
Click image to show/hide labels. Right click to enlarge.
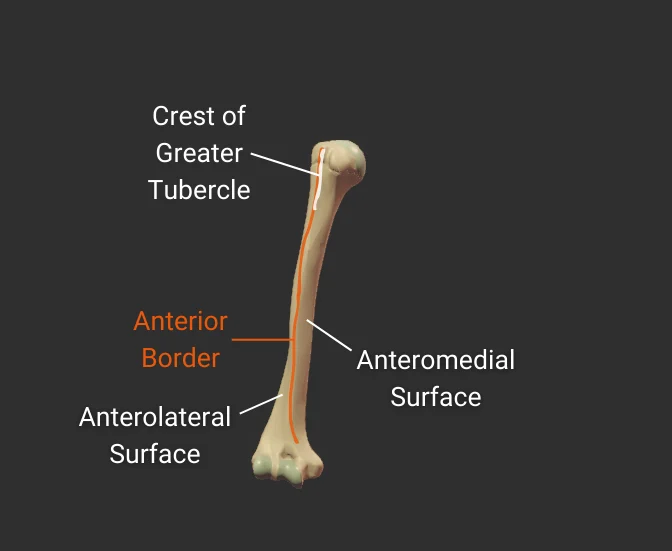
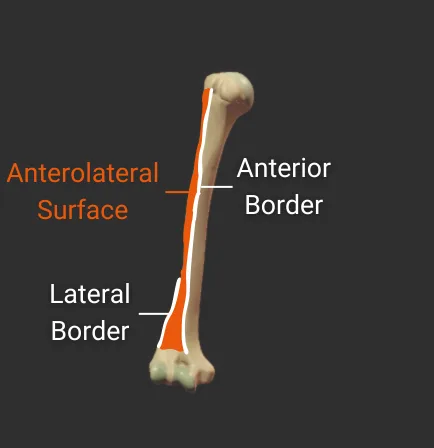
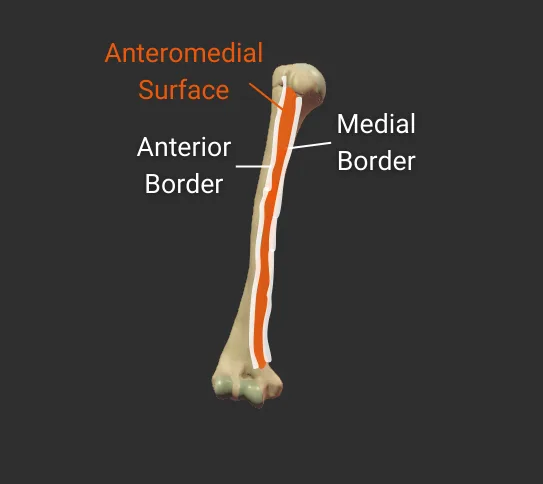
- Anterior ridge on the humerus's body
- Proximal end is the crest of the greater tubercle
- Separates the anteromedial and anterolateral surfaces
Click image to hide labels.
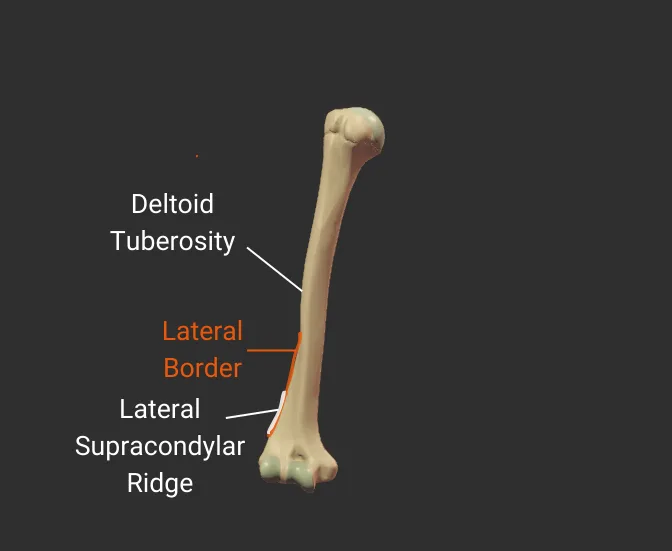
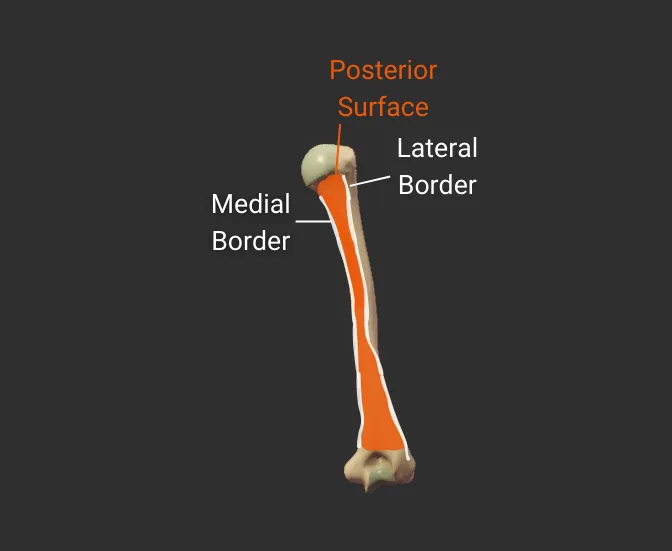
- Lateral ridge on the humerus's body
- Starts at the greater tubercle
- Runs next to the deltoid tuberosity
- Distal end is the lateral supracondylar ridge
- Separates the anterolateral and posterior surfaces
Click image to hide labels.
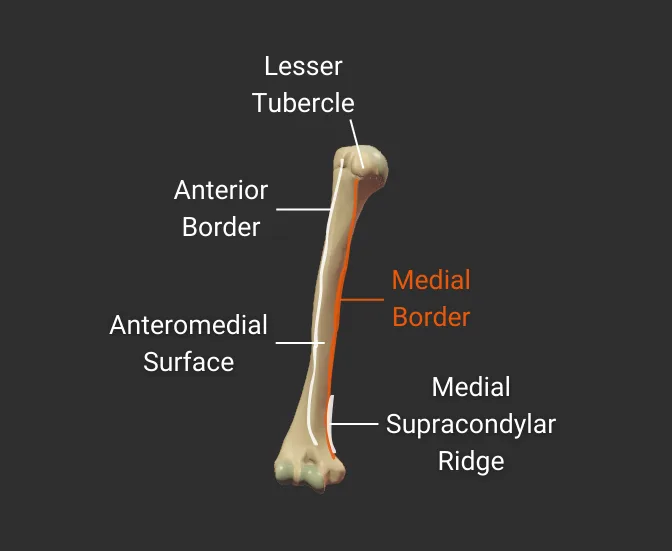
- Medial ridge on the humerus's body
- Starts at the lesser tubercle
- Distal end is the medial supracondylar ridge
- Separates the anteromedial and posterior surfaces
Click image to hide labels.
Surfaces
Click image to hide labels.
The surfaces of the humerus encompass the following landmarks:
Click the bulleted names for more information.
Click image to show/hide labels. Right click to enlarge.
- Surface between the anterior and lateral borders"
- Encompasses the deltoid tuberosity
- Proximal portion is covered by the deltoid
- Origin site for the lateral brachialis
Click image to hide labels.
- Surface between the anterior and medial borders
- Encompasses the intertubercular groove
- Distal portion is covered by the brachialis
- Insertion site for the coracobrachialis
- Surface between the lateral and medial borders
- Covered by the medial head of the triceps brachii
- Origin site for the medial and lateral heads of the triceps
- Medial head inserts inferior to the radial groove
- Lateral head inserts superior to the radial groove
Click image to hide labels.
Supracondylar Ridges
The supracondylar ridges of the humerus encompass the following landmarks:
Click the bulleted names for more information.
Click image to show/hide labels. Right click to enlarge.
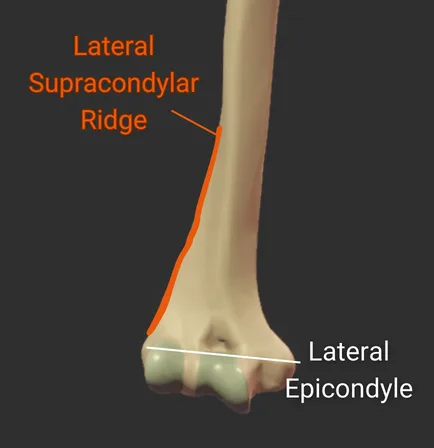
- Ridge above the lateral epicondyle
- Origin site for the brachioradialis and the extensor carpi radialis longus
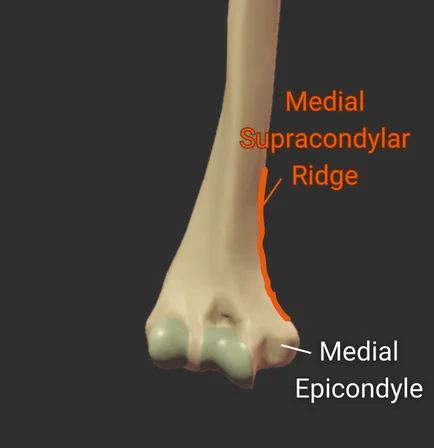
- Ridge above the medial epicondyle
- Origin site for the pronator teres's humeral head
Click image to hide labels.
Epicondyles

Click image to hide labels.
The epicondyles of the humerus encompass the following landmarks:
Click the bulleted names for more information.
Click image to show/hide labels. Right click to enlarge.
- Small lateral prominence on the humerus's distal end
- Attachment site for the radial collateral ligament
Click image to hide labels.
- Larger medial prominence on the humerus's distal end
- Origin for forearm flexor muscles and ulnar collateral ligament
- The posterior side contains the groove for the ulnar nerve

Click image to hide labels.
Fossas
Click image to hide labels.
The fossas of the humerus encompass the following landmarks:
Click the bulleted names for more information.
Click image to show/hide labels. Right click to enlarge.
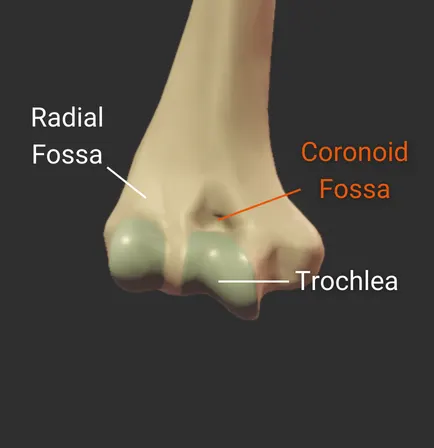
- Anterior depression superior to the trochlea
- Accommodates the ulna's coronoid process during deep elbow flexion
Click image to hide labels.
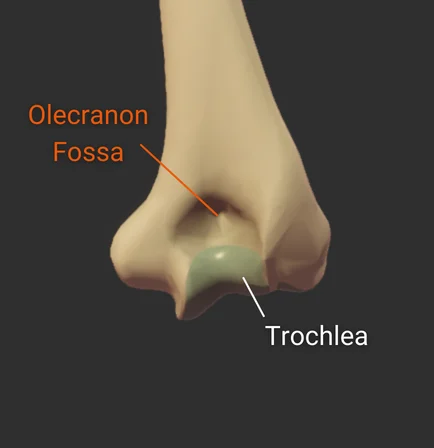
- Large posterior depression superior to the trochlea
- Accommodates the ulna's olecranon process during elbow extension
Click image to hide labels.
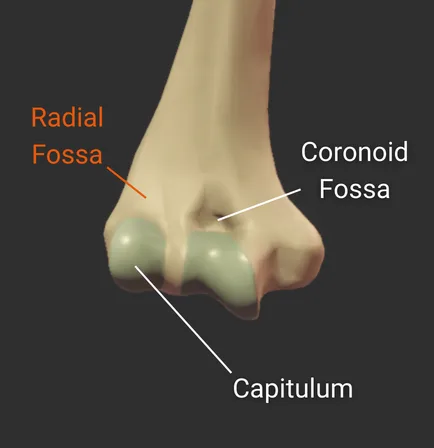
- Small anterior depression superior to the capitulum and lateral to the coronoid fossa
- Accommodates the radial head during elbow flexion
Click image to hide labels.
Distal Structures

Click image to hide labels.
The distal structures of the humerus encompass the following landmarks:
Click the bulleted names for more information.
Click image to show/hide labels. Right click to enlarge.
- Rounded structure on the humerus's distal end
- Articulates with the head of the radius
- Allows for forearm rotation and flexion
- Lateral to the humerus's trochlea
Click image to hide labels.
- Name for the humerus's trochlea and capitulum when looked at together
- Forms the humerus's elbow joint surface

Click image to hide labels.
- Groove on the posterior surface of the medial epicondyle that the ulnar nerve runs through
- “Funny bone” area because striking this area compresses the ulnar nerve and leads to the “funny bone” sensation
- Also called the Cubital Groove

Click image to hide labels.
- Pulley-shaped structure on the humerus's distal end
- Articulates with the trochlear notch of the ulna
- Allows for hinge movement
- Medial to the humerus's capitulum

Click image to hide labels.
UNFINISHED
Plan: Write a description that gives an overview of the entire structure of blood vessels in the humerus. Then lead into breaking them up into proximal, shaft, and distal.
NOTE: I have not yet verified that the arteries I have listed for the proximal region, shaft, and distal regions are correct.
The proximal region of the humerus is supplied by the following arteries:
- Anterior Circumflex Humeral Artery
- Posterior Circumflex Humeral Artery
The shaft of the humerus is supplied by the following arteries:
- Nutrient Artery of the Humerus
- Brachial Artery Branches
- Profunda Brachii Branches
The distal region of the humerus is supplied by the following arteries:
- Radial Collateral Artery
- Middle Collateral Artery
- Superior Ulnar Collateral Artery
- Inferior Ulnar Collateral Artery
References
Landmarks and General Anatomy
Muscles
- Kenhub – Supraspinatus Muscle
- Kenhub – Brachialis Muscle
- Kenhub – Upper Limb Muscles and Movements
- Kenhub – Arm Muscles
- Kenhub – Latissimus Dorsi Muscle
- Kenhub – Extensor Carpi Radialis Longus
- Kenhub – Pronator Teres Muscle
Joints and Ligaments
- Kenhub – Elbow Joint
- Kenhub – Ligaments of the Upper Limb
- Kenhub – Head of Radius
- Kenhub – Proximal Radioulnar Joint
- Anatomy.co.uk – Humeroulnar Joint
- Anatomy.co.uk – Humeroradial Joint
Nerves
Arteries
Images
All images taken from Z-Anatomy. As of the date this was written (February 2, 2026), Z-Anatomy has a CC-BY-SA 4.0 License.
Feedback
We'd love to hear from you! Fill out the form below and we'll get back to you at contact@anatomyquest.org.